7-Spring集成MyBatis
MyBatis使用步骤
先来回顾以下MyBatis的使用步骤:
- 创建DAO接口
- 创建实体类
- 创建映射文件
- 创建MyBatis主配置文件
- 使用SqlSessionFactory创建出SqlSession对象(也在主配置文件中)
- 使用SqlSession对象获得dao接口的实现类对象
- 执行数据库操作
集成到Spring后需要的改动
那么将MyBatis集成到Spring中以后。需要改动的有:
- 主配置文件中不再需要数据源的配置,数据源要交给Spring容器来管理,在spring配置文件中配置。
- 对mapper文件的注册,应该使用标签,即只需要给出mapper映射文件所在的包。因为mapper文件的名称和DAO接口名称相同。因此使用这种方式的好处是,若有多个映射文件,配置也不需要修改。当然也可以使用原来的标签
- SqlSessionFactory对象不需要我们来创建,也交给spring容器。
- DAO对象同样交给spring容器。
因此,需要让spring创建的对象有:
- 独立的连接池类对象,不使用MyBatis默认的连接池,而使用阿里的Druid连接池
- SqlSessionFactory对象
- dao对象
注意:MyBatis集成到Spring后,默认是自动提交事务,不需要写sqlSession.comit();。
MyBAtis集成到Spring后使用步骤
新建Maven项目
加入maven依赖
- spring依赖
- mybatis依赖
- mybatis和spring集成的依赖
- mysql驱动依赖
- spring事务的依赖
创建实体类
创建dao接口
创建mapper文件
创建myBatis主配置文件
创建Service接口和实现类,实现类成员变量是dao对象
创建spring配置文件:声明将mybatis的对象交给spring创建,有:
- 数据源
- SqlSessionFactory
- DAO对象
- 自定义的Service对象
编写测试代码,获取Service对象,通过service调用dao来操作数据库
配置数据源
首先在spring配置文件applicationContext.xml文件中配置数据源,查询druid的github官网,可以看到通用配置:
1
2
3
4
5
6
7
8
9
10
11
12
13
14
15
16
17
18
19
20
21
22
23
24
| <bean id="dataSource" class="com.alibaba.druid.pool.DruidDataSource" init-method="init" destroy-method="close">
<property name="url" value="${jdbc_url}" />
<property name="username" value="${jdbc_user}" />
<property name="password" value="${jdbc_password}" />
<property name="filters" value="stat" />
<property name="maxActive" value="20" />
<property name="initialSize" value="1" />
<property name="maxWait" value="60000" />
<property name="minIdle" value="1" />
<property name="timeBetweenEvictionRunsMillis" value="60000" />
<property name="minEvictableIdleTimeMillis" value="300000" />
<property name="testWhileIdle" value="true" />
<property name="testOnBorrow" value="false" />
<property name="testOnReturn" value="false" />
<property name="poolPreparedStatements" value="true" />
<property name="maxOpenPreparedStatements" value="20" />
<property name="asyncInit" value="true" />
</bean>
|
其中属性 init-method="init"和destory-method="close"是固定的,这两个方法是在DruidDataSource中写好的。
在上面的配置中,通常只需要配置url、username、password和maxActive。
其中maxActive是设置最大有多少连接数。
Druid会自动根据url识别驱动类名,所以不需要配置driver。
创建SqlSessionFactory对象
在spring文件中配置SqlSessionFactory对象。
之前创建SqlSessionFactory对象,只需要MyBatis配置文件,但是现在把数据源的配置挪到了Spring配置文件中,所以需要两部分,一是Spring配置的数据源,二是mybatis配置文件。
格式为:
1
2
3
4
| <bean id="sqlSessionFactory" class="org.mybatis.spring.SqlSessionFactoryBean" >
<property name="dataSource" ref="" />
<property name="configLocation" value="classpath:" />
</bean>
|
其中,第一个的ref属性是上面配置数据源的id
第二个标签,是指定mybatis配置文件路径的。但是需要使用value属性,并且要加上classpath:
在后面写上mybatis的配置文件路径。
创建DAO接口对象
将创建dao接口对象也交给Spring容器,在配置文件中进行配置。
传统创建DAO对象,需要使用SqlSession对象,调用它的getMapper()方法,并把接口的类作为参数传给该方法。
那么在配置时,同样需要这几项。
使用MapperScannerConfigurer类:它会在内部多次调用getMapper生成多个dao接口的代理对象
语法格式为:
1
2
3
4
| <bean class="org.mybatis.spring.mapper.MapperScannerConfigurer" >
<property name="sqlSessionFactoryBeanName" value="" />
<property name="basePackage" value="" />
</bean>
|
该bean不需要id属性。
其中,第一个标签, 指定的是SqlSessionFactory,值应该是之前创建的SqlSessionFactory的id
第二个标签,指定的是DAO接口所在的包名,MapperScannerConfigurer会扫描这个包的每个接口,调用getMapper方法创建每个接口的代理对象,也就是DAO对象。
创建的dao对象的名字是接口名的首字母小写。
创建Service接口和实现类
在service包下,创建表的service接口。并在service.impl包下,创建对应实现类。在实现类里定义dao接口对象成员变量,然后不同方法对应数据库的操作。
一个例子
首先创建实体类Student:
1
2
3
4
5
6
7
8
| public class Student {
private Integer id;
private String name;
private String email;
private Integer age;
}
|
在dao包中创建DAO接口StudentDao
1
2
3
4
5
| public interface StudentDao {
Integer insertStudent(Student student);
List<Student> selectStudent();
}
|
创建映射文件:
1
2
3
4
5
6
7
8
9
10
| <mapper namespace="org.example.dao.StudentDao">
<insert id="insertStudent">
insert into student values (#{id}, #{name}, #{email}, #{age})
</insert>
<select id="selectStudent" resultType="org.example.domain.Student">
select * from student
</select>
</mapper>
|
创建MyBatis主配置文件:
1
2
3
4
5
6
7
8
9
10
11
12
13
14
15
16
17
18
| <configuration>
<settings>
<setting name="logImpl" value="STDOUT_LOGGING"/>
</settings>
<typeAliases>
<package name="org.example.domain"/>
</typeAliases>
<mappers>
<package name="org.example.dao"/>
</mappers>
</configuration>
|
创建service接口和实现类:
1
2
3
4
5
| public interface StudentService {
Integer addStudent(Student student);
List<Student> selectStudents();
}
|
1
2
3
4
5
6
7
8
9
10
11
12
13
14
15
16
17
18
19
| public class StudentServiceImpl implements StudentService {
private StudentDao studentDao;
public void setStudentDao(StudentDao studentDao) {
this.studentDao = studentDao;
}
@Override
public Integer addStudent(Student student) {
return studentDao.insertStudent(student);
}
@Override
public List<Student> selectStudents() {
List<Student> list = studentDao.selectStudent();
return list;
}
}
|
创建spring配置文件applicationContext.xml
1
2
3
4
5
6
7
8
9
10
11
12
13
14
15
16
17
18
19
20
21
|
<bean id="druid" class="com.alibaba.druid.pool.DruidDataSource" init-method="init" destroy-method="close">
<property name="url" value="jdbc:mysql://localhost:3306/test" />
<property name="username" value="root" />
<property name="password" value="*******" />
<property name="maxActive" value="20" />
</bean>
<bean id="sqlSessionFactory" class="org.mybatis.spring.SqlSessionFactoryBean" >
<property name="dataSource" ref="druid" />
<property name="configLocation" value="classpath:mybatis.xml" />
</bean>
<bean class="org.mybatis.spring.mapper.MapperScannerConfigurer" >
<property name="sqlSessionFactoryBeanName" value="sqlSessionFactory" />
<property name="basePackage" value="org.example.dao" />
</bean>
<bean id="studentService" class="org.example.service.impl.StudentServiceImpl" >
<property name="studentDao" ref="studentDao" />
</bean>
|
编写测试代码:
1
2
3
4
5
6
7
8
9
10
11
12
13
14
15
16
17
18
19
20
21
| @Test
public void testSelectStudents() {
String config = "applicationContext.xml";
ApplicationContext applicationContext = new ClassPathXmlApplicationContext(config);
StudentService studentService =(StudentService) applicationContext.getBean("studentService");
List<Student> list = studentService.selectStudents();
for(Student stu: list) {
System.out.println(stu);
}
}
@Test
public void testAddStudent() {
String config = "applicationContext.xml";
ApplicationContext applicationContext = new ClassPathXmlApplicationContext(config);
StudentService studentService =(StudentService) applicationContext.getBean("studentService");
Student stu = new Student(1012, "林冲", "linchong@qq.com", 35);
int num = studentService.addStudent(stu);
System.out.println("影响行数为:" + num);
}
|
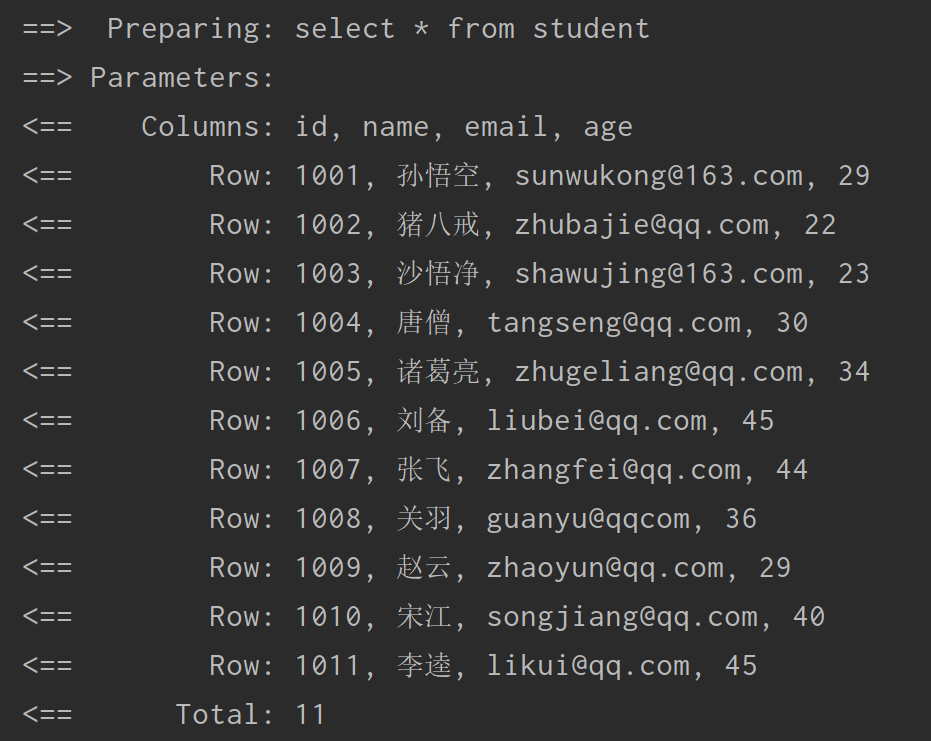
执行查询操作,运行结果为:

执行插入操作,运行结果为:

使用属性文件
使用properties属性文件来配置数据库连接信息,在spring配置文件中引用配置文件。
首先加入在spring配置文件中加入命名空间:
1
| xmlns:context="http://www.springframework.org/schema/context"
|
然后使用<context:property-placeholder location="classpath:" />
标签来设置属性文件的路径
最后通过${属性文件中设置的key}来进行访问
例子:
设置路径:
1
| <context:property-placeholder location="classpath:jdbc.properties" />
|
使用:
1
2
3
4
5
6
| <bean id="druid" class="com.alibaba.druid.pool.DruidDataSource" init-method="init" destroy-method="close">
<property name="url" value="${jdbc.url}" />
<property name="username" value="${jdbc.username}" />
<property name="password" value="${jdbc.password}" />
<property name="maxActive" value="${jdbc.max}" />
</bean>
|

